

I watched a guy rip his rear bumper off last spring with a $90 tow strap and a running start. The truck was buried to the axle in clay, he had no anchor point rated for the load, and the whole thing took maybe twelve seconds. The bumper let go, the strap came back through the air like a whip, and everyone standing nearby scattered. Nobody got hurt. It was close.
That moment is why I keep coming back to off-road recovery techniques as the single most underrated skill in the hobby. Everyone buys lift kits and 35s. Almost nobody practices recovery. And when the question of a riding rail kit comes up in that context, the conversation gets genuinely confusing, because most people have never actually seen one and half the internet seems to be describing something else entirely. So let's sort it out.
Key Takeaways
- A riding rail kit is a vehicle-specific accessory, not a universal recovery tool. What it does depends entirely on the platform you bolt it to.
- Recovery force scales with how deep the vehicle sits, not with how big the engine is. A buried truck can demand multiples of its own weight in pull.
- Your weakest link sets your safe working load. In most amateur setups, that link is the factory tow hook, not the strap.
- Kinetic straps and tow straps are not interchangeable, and using one as the other is how people get hurt.
- No gear substitutes for an assessed anchor point. If the anchor fails, the entire load goes airborne.
What a riding rail kit actually does off-road (and what it doesn't)
Here's the thing that trips people up: a riding rail kit has nothing to do with recovery in the sense of pulling a stuck vehicle out of a hole. It's a mounting and protection system. On side-by-sides and some utility ATVs, a rail kit provides a reinforced rail structure along the chassis or bed, giving you a mounting surface for accessories and a degree of skid protection in terrain that would otherwise chew through bodywork.
So why do people search for it alongside recovery techniques? Because the rail itself can serve as a mounting point for a recovery board holder, a hi-lift jack base plate, or a winch fairlead bracket on certain builds. That's a legitimate use. But I've seen people assume the rail is a rated anchor, and that assumption is dangerous.
Mounting, protection, and the limits of both
A rail kit typically bolts to existing factory points. It adds stiffness and a place to hang things. What it does not do is increase the amount of force your chassis can withstand during a kinetic pull. Those are separate properties, and confusing them is easy because the rail feels solid when you grab it.
Treat the rail as an accessory mount until the manufacturer explicitly rates it for recovery loads. If the documentation doesn't state a working load limit, you don't have one.
Where the rail kit fits in a real recovery kit
The useful role is organization. A rail-mounted board holder keeps your traction boards out of the mud and off the floor of the bed, which means you actually use them instead of digging through a pile of wet gear at dusk. That's a real improvement. Not glamorous, but real.
I mounted a set of boards to a rail setup on a borrowed side-by-side for a weekend of trail work and the difference in how fast we could deploy was noticeable. Maybe forty seconds saved per recovery. Over a long day of pulling people out of a sandy wash, that adds up.
What should be in an off-road recovery kit?
The honest answer is that it depends on where you drive and whether you travel alone. A kit for a group running forest roads in a convoy looks very different from a solo rig crossing desert. But the core layers are consistent.
| Layer | What goes in it | Why it matters |
|---|---|---|
| Anchor and connect | Recovery strap or kinetic rope, rated shackles, tree saver, snatch block | You cannot pull without a rated connection path |
| Traction | Traction boards, shovel | Often resolves the situation before a winch is needed |
| Force multiplier | Winch or hand winch, pulley | Lets one vehicle do work that two can't |
| Safety | Gloves, dampener blanket, first aid, gloves again | Stored energy is the actual hazard |
| Air management | Deflator, portable compressor | Pressure changes prevent most stucks |
Notice what isn't on that list: a bumper-mounted rail accessory. Useful, yes. Recovery-critical, no.
Sizing the gear to the vehicle
Recovery gear is rated by working load limit, and your gear should be sized to your vehicle's gross weight with margin. A small SUV and a loaded three-quarter-ton pickup need different straps. Pulling a heavier vehicle with lighter gear is the classic failure mode, and it fails at the worst possible moment.
Rough starting point: match your strap and shackle ratings to at least your vehicle's gross vehicle weight rating, then add headroom for the fact that a stuck vehicle requires far more force than a rolling one.
What are some effective off-road recovery techniques?
Four techniques cover almost everything the average driver will encounter. Learn them in order of escalation, because the cheapest, lowest-force option should always come first.
Lower the pressure, add traction
Air down. Drop to a pressure that gives the tire a footprint, which in practice often means single digits to low teens depending on tire and load. Then, if you're still spinning, boards go under the tires. Dig out in front of the tire rather than behind it — the goal is a ramp, not a hole.
This solves a large share of sand, snow, and loose-soil situations without anyone attaching a strap. I'd estimate it handles the majority of cases where the vehicle is high-centered on soft ground and hasn't broken anything.
Kinetic recovery with a second vehicle
A kinetic rope stores energy and releases it, giving a gentle pull rather than a shock. The driver of the stuck vehicle does not add throttle. The recovering vehicle builds moderate speed and lets the rope do the work. Two people, one conversation, one plan before anything moves.
This is where most of the damage happens. People use a static tow strap as if it were kinetic, then take a run-up. A static strap under a running start transmits an enormous shock load straight into both vehicles' mounting points. That's the bumper incident I mentioned at the top.
Winching
Slow, controlled, and the most reliable of the force-based methods. Find an anchor you have actually inspected, use a tree saver rather than wrapping around bark, add a dampener over the line, and keep everyone outside the triangle formed by the winch, the anchor, and the vehicle.
Recovery force climbs steeply with how deep the vehicle sits. A truck buried to the frame in clay can need several times its own weight in pull. This is precisely why gear rating matters and why a small winch on a heavy truck is a false economy.
Dig, stack, and drive out
Underrated and unglamorous. Clear the underside, build a path of rocks or boards, and drive out slowly under your own power. It takes longer than a kinetic pull and damages nothing.
What is a common mistake during an off-road recovery?
The single most common mistake is using an unrated attachment point. Factory tow hooks on many vehicles are designed for emergency towing on pavement, not for the shock loads of off-road extraction. They bend. They shear. When they go, hardware becomes a projectile.
Other repeat offenders I see constantly:
- Standing inside the line of pull to "watch the strap"
- No dampener on a winch line or kinetic rope
- Attaching to a hitch ball, which is designed for longitudinal trailer load, not lateral shock
- Wrapping a strap directly around a tree without a saver, killing the tree and abrading the strap
- Two drivers pulling at the same time with no agreed signal to stop
The pattern behind all of these is the same: someone skipped the assessment step because the situation felt urgent. Slow the first thirty seconds down and the rest goes faster.
The mistake nobody mentions: no agreed stop signal
Before any pull, agree on a stop signal that everyone can see and that requires no shouting. Raised open hand. Then honor it instantly, no questions. I once watched a pull continue for several seconds after the spotter's signal because the driver was watching the tires instead of the spotter. Nothing broke. It could have.
How does Matt's off-road recovery get paid?
Matt's Off Road Recovery, the well-known YouTube channel out of southern Utah, is a commercial recovery operation. The revenue model is a mix: the channel earns from advertising and sponsorships, and the business itself charges customers for recovery calls, with pricing typically based on the difficulty and distance involved. That combination is what allows them to run heavy equipment and take on recoveries that a hobbyist couldn't touch.
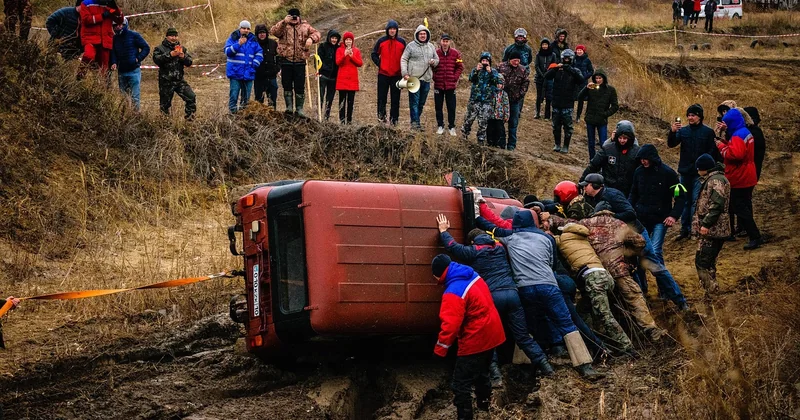
Worth noting for anyone considering calling a professional: the reason a paid recovery exists as a service is that certain situations genuinely exceed what amateur gear and amateur judgment can handle safely. A vehicle on a steep slope, a rollover, a recovery in fast water — call someone. There's no shame in it, and the alternative is worse.
Recovering after the wheels have dropped off the roadway
If your wheels have dropped onto a soft shoulder, the correct move is to steer back onto the pavement gradually, using the tire's sidewall to ease the transition, while keeping steady light throttle. Do not yank the wheel. The moment you add sharp steering input at speed, you risk rolling or pulling the vehicle further off.
If you're already stopped and stuck against a drop-off, the recovery is a slow one: assess the slope, use boards or a spotter to guide a controlled re-entry, and treat it as a low-speed operation. Most of the damage in these scenarios comes from a panicked correction, not from the initial drop.
And when the ground is genuinely unstable, the answer might be a second vehicle, a strap, and patience. Or a phone call. Both are valid. The point of practice — the drills, the kit, the reading — is that when it happens for real, the decision takes one second, not thirty. That's the whole game.


